QuickBooks Accounting Software Set Up and Troubleshooting

QuickBooks Online Direct Integration Guide
Export and Set Up
1. Navigate to the Transactions tab > Click on the Accounting tab > Accounting Export > Connect QuickBooks Online
2. Answer basic 2 questions about structure
3. Review field values for Account, Class, and Location that have been pulled in automatically
4. You will have the choice to edit any fields that you would like to show or not show in Brink's
5. Finish the wizard
Access Your QuickBooks Online Integration
1. Click on Accounting Export > Filter transactions as needed
2. Utilize the bulk tag option to add Account, Location, and/or Class
3. Tagged fields will then sync back to your QB system, manually or automatically based on your preferences
Note: If you would like to map a different Brink's field to one of the fields imported from QuickBooks online, you may edit or delete any of these fields using the tabs on the Accounting Export QuickBooks page.
Troubleshooting Red Sync Button
If your Sync button is currently red, this could be because a change was manually made to your QuickBooks Online chart of accounts. Here's how to troubleshoot it:
If you altered the title or delete the Brink's Uncategorized Expense
1. Log in to your QuickBooks account > From the dashboard menu, click Accounting
2. In the search bar, type in the name of the newly altered Uncategorized Expense
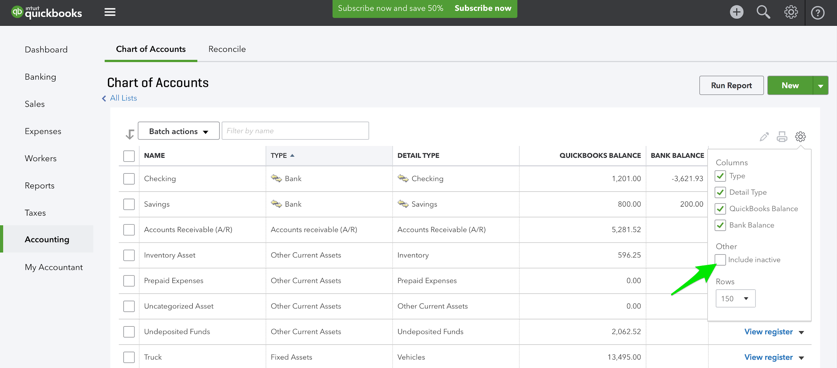
3. Please make sure that you include any inactive/deleted accounts by clicking on the Gear icon and checking the Include Inactive box
4. After locating the newly altered or deleted Brink's Uncategorized Expense account, please edit it so that the title exactly reads: Brink's Uncategorized Expense
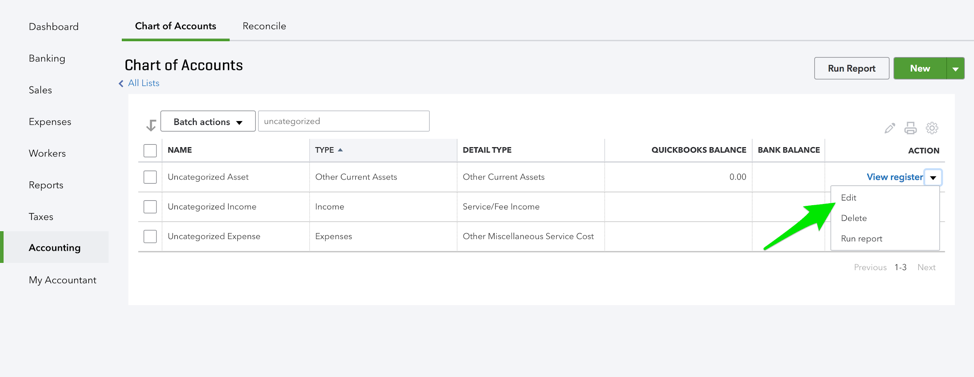
5. To edit the name of the account, click View Register > Edit
6. Editing the title should solve any red button syncing issues related to this topic. Our system will check if the chart of account issue is fixed within 24 hours and change the button from red to green.
If You Changed Your Brink's Uncategorized Expense Account Type to a Liability or Credit Card
Brink's Uncategorized Expense is a prepaid expense therefore it would not be a liability or a credit card.
If You Deleted 'Brink's Checking'
1. Click the Gear icon > Include Inactive
2. This should populate search results for any inactive accounts which will be marked as (deleted) in the title
3. Click Edit > Uncheck the inactive box > Save
Note: If you deleted your Brink's Checking because you wanted to use your own Checking account, please let us know and we can set that up for you.
If you altered the title or delete the Brink's Uncategorized Expense
1. Log in to your QuickBooks account > From the dashboard menu, click Accounting
2. In the search bar, type in the name of the newly altered Uncategorized Expense
3. Please make sure that you include any inactive/deleted accounts by clicking on the Gear icon and checking the Include Inactive box
4. After locating the newly altered or deleted Brink's Uncategorized Expense account, please edit it so that the title exactly reads: Brink's Uncategorized Expense
5. To edit the name of the account, click View Register > Edit
6. Editing the title should solve any red button syncing issues related to this topic. Our system will check if the chart of account issue is fixed within 24 hours and change the button from red to green.
If You Changed Your Brink's Uncategorized Expense Account Type to a Liability or Credit Card
Brink's Uncategorized Expense is a prepaid expense therefore it would not be a liability or a credit card.
If You Deleted 'Brink's Checking'
1. Click the Gear icon > Include Inactive
2. This should populate search results for any inactive accounts which will be marked as (deleted) in the title
3. Click Edit > Uncheck the inactive box > Save
Note: If you deleted your Brink's Checking because you wanted to use your own Checking account, please let us know and we can set that up for you.
Troubleshooting Unknown Server Error
If you've encountered an Unknown Server Error when syncing transactions or setting up your Brink's and QuickBooks Online integration, it may be due to an out-of-date or incompatible browser.
Please ensure that you are using a compatible browser such as the most recent versions of Chrome, Firefox, or Safari. Microsoft Edge and Internet Explorer will not work with the Brink's website.
We also recommend clearing your browser cache and cookies when you experience issues logging into the Brink's website.
Brink's recommends automatic (daily) QuickBooks Online syncing only if you are not opting into our new coding options. This will push your settled transactions to QuickBooks Online on a daily basis. For users taking advantage of our advanced mapping, we recommend manual syncing to allow for tag maintenance and updates.
You must have the correct credentials and level of permissions within QuickBooks Online before attempting to set up the integration or sync transactions. Also, please ensure that your Brink's account as listed within your QuickBooks Chart of Accounts is not designated as a Liability.
You must have the correct credentials and level of permissions within QuickBooks Online before attempting to set up the integration or sync transactions. Also, please ensure that your Brink's account as listed within your QuickBooks Chart of Accounts is not designated as a Liability.